Gillray's Techniques*
Balaam, or the Majesty of the People [1783]
© Private Collection
Printing
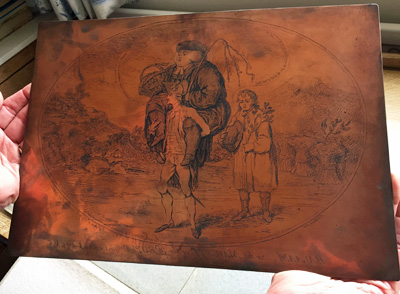
Gillray's prints were all created using variations of what is called the intaglio process. In this process, marks or incisions are made on a metal plate (in Gillray's case, copper). When the plate is inked and then wiped, the ink remains in the pits and furrows, but not on the surface of the plate. The plate is then placed face up on the bed of a printing press and covered with a damp piece of paper. When pressure is then applied to the paper by a roller, the damp paper takes up the ink and a print is created. The marks on the plate can be created in variety of ways. And Gillray often combines several techniques in a single print.
Engraving
One way of marking the copper plate is with a graver or burin. The burin has a very sharp V-shaped end which when pushed into the copper plate creates a furrow. In general, heavy pressure creates a wider and deeper furrow; lighter pressure results in a thinner, shallower line.
© National Portrait Gallery, London
But the engraver can also modulate the thickness of the line by tilting the burin while applying a steady pressure. Although trained as an engraver, Gillray typically used engraving as a secondary technique, to add finer touches, reinforce lines, or refine an image that had already been sketched out through another method for marking a plate—etching.
Drypoint
Another method of marking the plate is with a very sharp instrument called a drypoint needle. Like engraving, drypoint is executed right on the copper plate. But unlike engraving the lines are scratched onto the plate as if one were sketching or drawing with a pencil. The furrow created is shallower than an engraved line, and the ink is held not so much by the furrow itself as by the raised edge or burr along the sides of the furrow. The angle at which the needle is held against the plate will determine which side of the furrow will have a higher burr.
Because the burr can wear down in the process of printing, drypoint was again a secondary technique for Gillray, used only for special effects or for prints that he must have anticipated would have a smaller print run.
Etching
The method most often used by Gillray was etching. Like an engraving, an etching begins with a copper plate. But in this case the plate is covered with a darkened, acid-resistant "ground" made of a material that is easily removed as the artist draws on the plate with an etching needle. This allows the artist to work with much greater freedom and much less effort than with a burin. When the design is complete, the copper plate is put into a bath of acid. The acid will only "bite" into the plate where the copper has been exposed by the etching needle. The rest of the plate will remain smooth. The thickness of the resulting etched lines will depend upon the width of the needle used and/or the amount of time the plate is exposed to the acid.
© Trustees of the British Museum
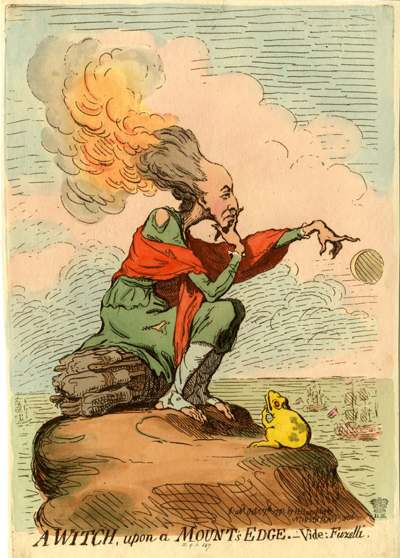
In both etching and engraving, tones can be created by incising a series of parallel lines in that area. The closer the lines are to one another, the deeper the tone. A similar effect can be created by cross-hatching, creating a network of lines in the area that cross over one another at minute intervals. In a print like A Witch upon a Mount's Edge (1791), Gillray uses parallel lines to suggest lightly toned areas and cross-hatching to suggest deeper areas of shadow. Sometimes, as here, he would simply use a series of somewhat random squiggly lines to create shading rather than the painstakingly regular lines and cross-hatching he might use in a more formal print. In this colored print, the shade lines are reinforced by the beautiful and subtle use of watercolor.
Stipple Engraving
Thus far we have been speaking of lines, but as early as the 16th century, engravers also discovered another way of creating shading—by creating a pattern of dots with the burin. Indeed, they soon discovered that they didn't need to create lines at all, but simply dots or stipples of varying patterns and density.
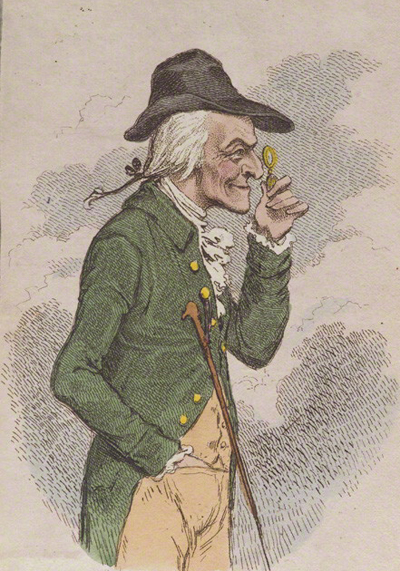
A dense pattern would result in a dark area or line, a sparse pattern in a lighter area or thinner line. They also began developing additional tools so they could create regular patterns of dots more quickly. Two such tools are the roller and the roulette which, as their names suggest, are rolled across the plate. Each roller or roulette can have a different dot or line configuration, thus creating different patterns. Gillray almost certainly used rollers or roulettes in his portrait of the Duke of Queensberry, Quiz-zing a Filly [1795]. Like other 18th century print-makers, Gillray would doubtless have had a variety of roulettes and rollers at his disposal.
© Trustees of the British Museum
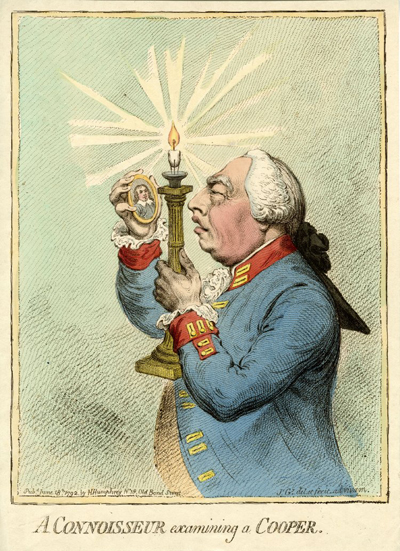
In his famous satiric portrait of King George III, A Connoisseur Examining a Cooper (1792), one can see Gillray employing elaborate stippling to create a beautifully subtle range of tones.
Aquatint
Aquatint is another process to create tones in a print, in this case similar to those of a watercolor. A special resin is applied to the copper plate either at the very beginning or after the outline of a basic design has been established. The resin is applied as a powder or as a liquid and heated so that it bonds with the plate, creating a grainy, textured surface. When the plate is dipped into acid, the acid penetrates between the grains, creating large areas of shading. The longer the plate remains in the acid, the darker the shade. Different degrees of shading can be created on the same plate by covering over lightly shaded areas with an acid-resistant ground, and returning the plate to the acid for areas of deeper shade. In another early plate, The Board of Controul (1787) we can already see Gillray using a mix of shading techniques—parallel lines, cross-hatching, and two shades of aquatint.
References*
The best book resources I've found to learn more about printmaking are:
- Richard Godfrey, Printmaking in Britain, New York: New York University Press, 1978.
- Griffiths, Antony, Prints and Printmaking, Berkeley and Los Angeles, University of California Press, 1996
- Draper Hill, The Satirical Etchings of James Gillray, New York: Dover Publications, 1976.
- William M. Ivins, How Prints Look, Boston: Beacon Press, 1958.
But there are also wonderful videos covering nearly all aspects of printmaking on Youtube. Here are some that helped me gain a better understanding of the processes.
There is also an excellent online blog about the print culture of the 18th century, The Printshop Window - Caricature & Graphic Satire in the Long Eighteenth-Century.